How To Set Up Web Hosting and Start Your First Website
Starting your first website can feel more complicated than it really is.
You hear terms like web hosting, domains, WordPress, SSL certificates, DNS and servers before you’ve even created your first page.
The good news is that you don’t need to understand all of that before getting started.
In this guide, I’ll walk you through the process of setting up web hosting with InMotion Hosting, registering or connecting your domain, and getting ready to build your website with WordPress.
I’ve broken everything into simple steps, and I’ll show you what to look for along the way.
Affiliate Disclosure: This page contains affiliate links. If you purchase InMotion Hosting through one of my links, I may earn a commission at no additional cost to you. I only recommend products and services I believe can be useful to my readers.
Quick Overview: What You’ll Need
To create your own website, you generally need three main things:
A domain name – This is your website’s address, such as yourwebsite.com.
Web hosting – This is where your website’s files and data are stored so people can access your site online.
Website software – For this guide, we’ll be using WordPress, which allows you to build and manage your website without having to code everything yourself.
InMotion Hosting can handle the hosting side while also making it relatively easy to register a domain and install WordPress.
How Web Hosting Actually Works
You don’t need to understand the technical details of web hosting to run a website, but the basic idea is helpful.
Think about your website as a house.
Your domain name is the street address.
It tells people where to find you.
Your hosting account is the property where the house sits.
It’s where your website’s files and information live.
WordPress is the system you use to build and manage the house.
When someone enters your domain into a browser, their device connects to the server hosting your website and receives the information needed to display your pages.
That’s why both a domain and hosting are important.
Step 1: Go To InMotion Hosting
The first step is to visit InMotion Hosting and look at the currently available hosting options.
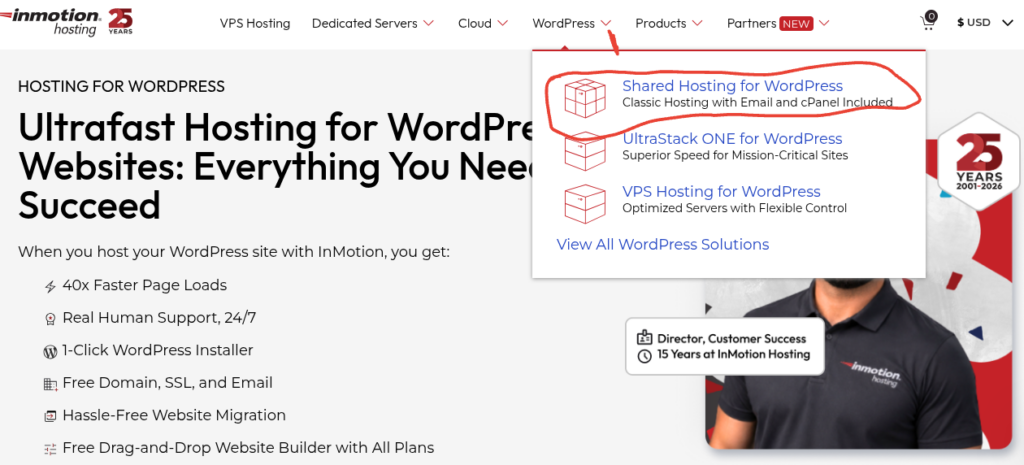
InMotion’s promotions and hosting options can change from time to time.
If you’re starting a blog, affiliate website, small business website or another relatively simple WordPress site, you usually don’t need an expensive dedicated server or complicated hosting setup.
I recommend starting with their Shared Hosting for WordPress plans.
From the InMotion Hosting homepage, click WordPress in the top menu, then choose Shared Hosting for WordPress, as shown in the image above.
This will take you to their current shared WordPress hosting plans.
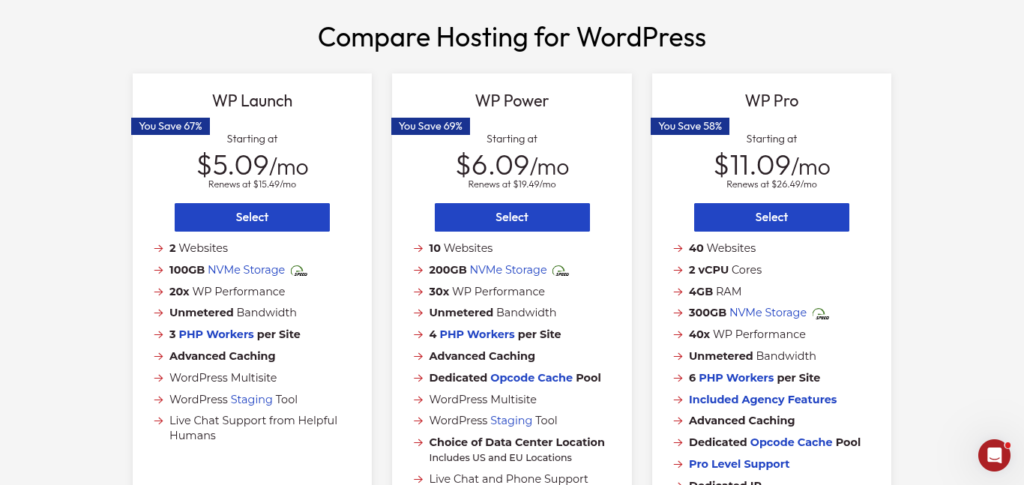
Step 2: Choose Your Hosting Plan
Once you’re on the hosting page, you’ll see the plans currently being offered by InMotion.
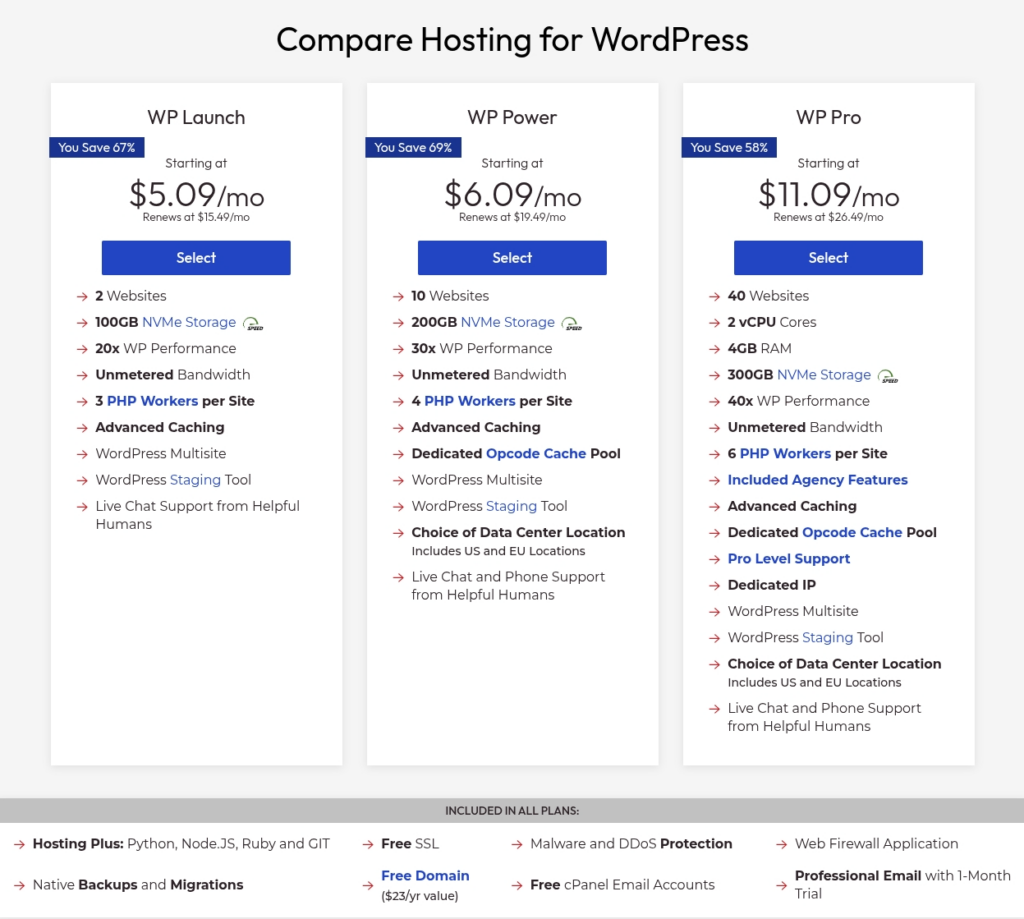
At the time this guide was updated, the plans shown above included a free domain offer. Check the current plan details and terms before purchasing, as promotions can change.
Don’t choose a plan based only on the lowest advertised monthly price.
Look at things such as:
- How many websites the plan allows
- Storage and resources
- Email accounts
- Included domain offers
- Backup options
- Security features
- Length of the introductory offer
- Renewal price
Which InMotion Hosting Plan Should I Choose?
The biggest question for most beginners is how many websites they expect to host.
Planning to host 1–2 websites?
The entry-level shared hosting plan should be enough for many beginners starting their first website.
Planning to host 3–10 websites?
Consider the next plan up. This may be a better value if you already know you’ll be creating or managing several websites.
Planning to host 11–40 websites?
Look at the higher-tier option designed for a larger number of websites and additional resources.
You don’t necessarily need to pay for capacity you won’t use.
If you’re creating your first website and aren’t sure whether you’ll ever build another one, starting smaller can make sense. You can generally upgrade later if your needs change.
Mike’s Tip: Pay attention to both the introductory price and the regular renewal price. Hosting companies frequently offer substantial discounts to new customers, but your renewal cost can be different.
Compare Current InMotion Plans
Step 3: Choose Your Hosting Term
Hosting companies commonly offer different prices depending on how long you sign up for.
The advertised monthly price may be based on paying for a longer hosting term upfront.
Before purchasing, check:
- The total amount due today
- How long the introductory price lasts
- The regular renewal price
A longer term may provide a lower equivalent monthly price, but it also usually means paying more upfront.
Make sure you’re comfortable with both the initial cost and the renewal cost before completing the order.
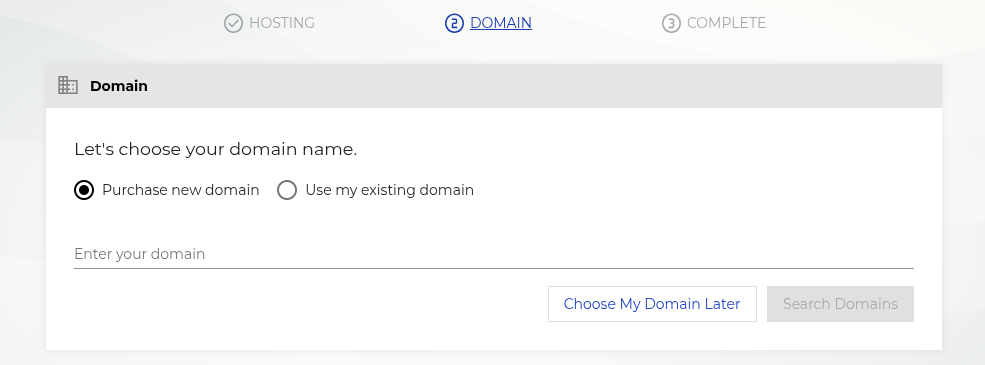
Step 4: Choose Your Domain Name
Next comes one of the more enjoyable parts: choosing your website’s domain name.
Your domain is the address people will type into their browser to visit your website.
For example:
mgtips.com
is a domain name.
Depending on the hosting plan and promotion currently available, InMotion may include a domain registration credit or give you the option to connect a domain you already own.
How To Choose A Good Domain Name
There isn’t one perfect formula, but I generally prefer domain names that are:
- Easy to remember
- Easy to spell
- Relatively short
- Easy to say out loud
- Relevant to the site’s overall topic or brand
- Broad enough to allow the website to grow
If a suitable .com is available, that’s usually my first choice.
You also don’t need to stuff keywords into your domain.
A memorable brand name can often be a better long-term choice than an awkward domain created solely to contain a particular search phrase.
Don’t Make Your Domain Too Narrow
Think about what your website could become in the future.
Suppose you wanted to create a site about outdoor cooking.
A domain focused exclusively on “portable charcoal grills” might make sense today, but what happens when you eventually want to write about propane grills, smokers, camping cookware and outdoor kitchens?
A slightly broader domain gives you room to expand.
Mike’s Tip: Before registering a domain, say the name out loud and imagine telling someone the address without writing it down. If you’d immediately have to explain how to spell it, you may want to keep looking.
Step 5: Create Your Account and Review Your Order
After choosing your hosting package and domain options, you’ll need to create your account.
This generally includes information such as your:
- Name
- Email address
- Contact information
- Account credentials
- Billing information
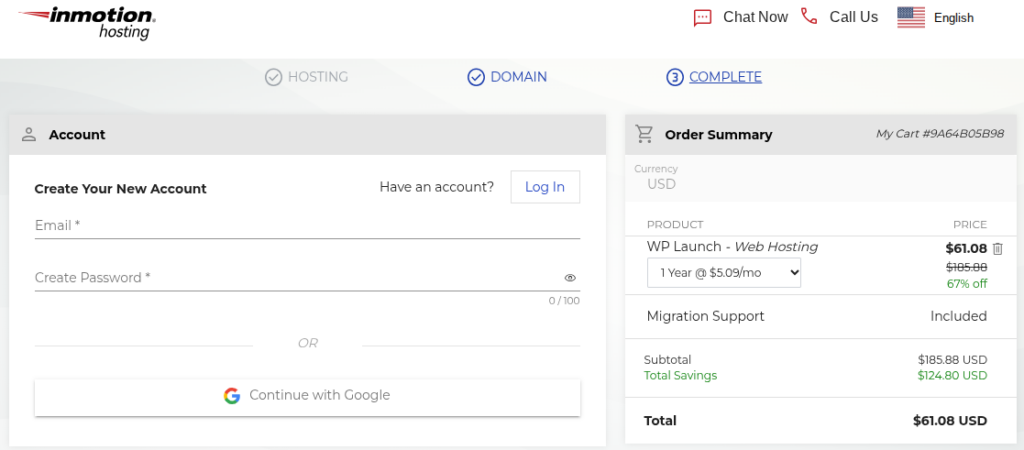
Make sure you use an email address you regularly check.
Your hosting provider may send important account, domain, billing, security and renewal notifications to this address.
Before paying, take a minute to review the entire order.
Check:
Hosting plan: Is this the plan you intended to purchase?
Billing period: Are you comfortable with the length of the term?
Domain: Is the spelling correct?
Total today: How much will actually be charged?
Renewal: What happens after the introductory period?
Optional services: Have any additional products been added?
Do You Need Every Hosting Add-On?
Probably not.
Depending on the current checkout process, you may be offered additional services or upgrades.
Don’t assume you need everything simply because it’s offered during checkout.
First determine what is already included with your hosting plan.
Then ask yourself:
Does this additional service solve a problem I actually have?
If the answer is no, you may not need it.
You can often add services later if your needs change.
Step 6: Complete Your Hosting Purchase
Once you’ve checked everything and you’re comfortable with your selections, complete the purchase.
After your order has been processed, you’ll receive information about accessing your InMotion account.
Keep your account information somewhere secure.
Step 7: Open cPanel
After your hosting account is active, log in to your InMotion account and open cPanel for the hosting account you want to manage.
cPanel is the control panel you’ll use to manage domains, WordPress installations, email, files and other hosting features.
Don’t worry about learning everything inside cPanel.
For this tutorial, we’re mainly interested in adding your domain and installing WordPress.
Mike’s Tip: Most website owners only use a small number of cPanel tools regularly.
Step 8: Add Your Domain To Your Hosting Account
If this is a new domain that isn’t already connected to your hosting account, you’ll first need to add it in cPanel.
From the main cPanel screen, scroll down until you find the Domains section.
Click Domains.
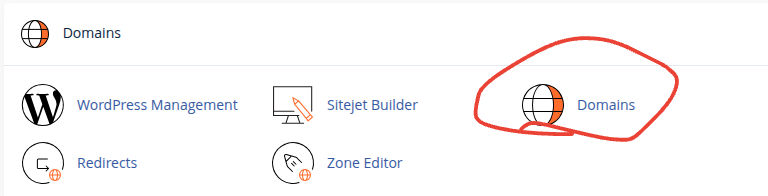
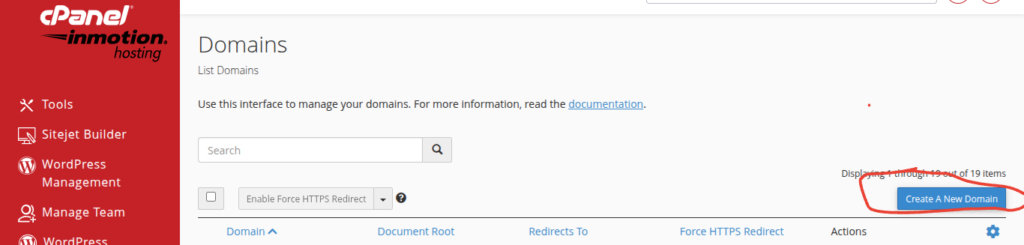
This opens the page that lists the domains currently associated with your hosting account.
Click Create A New Domain.
Enter Your Domain
Select Registered Domain when adding the domain you’ll use for your website.
Enter the domain without https:// or www.
For example:
yourwebsite.com
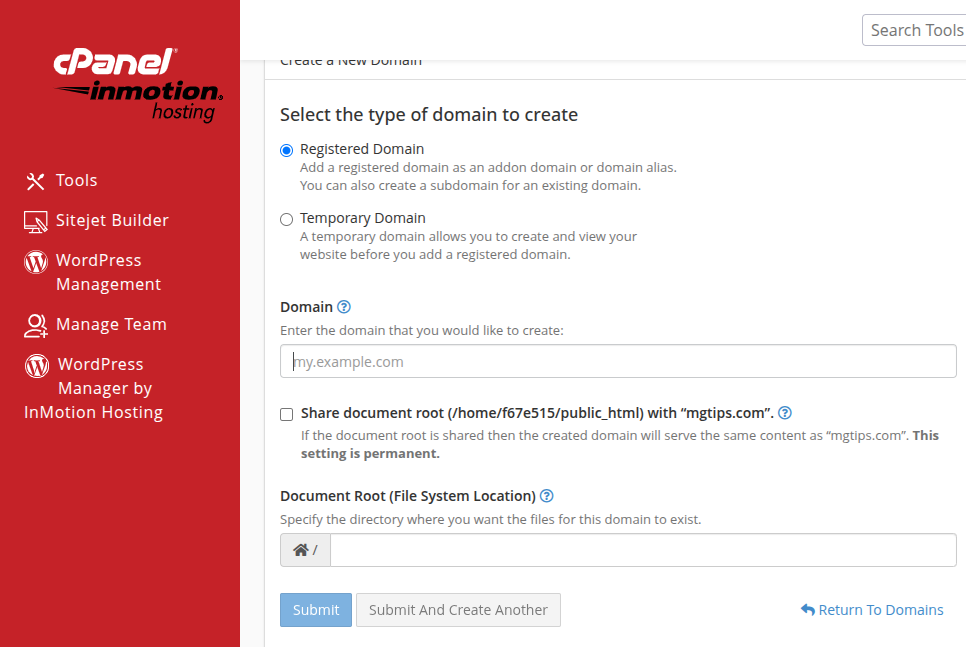
Document Root
cPanel will create a folder where the files for this website will be stored.
For a separate website, you normally want it to have its own document root.
Avoid selecting the option to share the document root with another website unless you specifically want both domains to display the same website.
For most people adding a new independent website, leave Share document root unchecked.
Once everything looks correct, click Submit.
Your new domain should now appear in the Domains section of cPanel.
Important: Adding the domain to cPanel doesn’t necessarily mean the domain is already pointing to your InMotion hosting account. If your domain was registered somewhere else, you may also need to update its nameservers or DNS settings.
Step 9: Open WordPress Management
Now that the domain has been added to your hosting account, you’re ready to install WordPress.
Return to the main cPanel area and open WordPress Management.
Depending on your InMotion account, this may appear as WordPress Management, WordPress Manager by InMotion Hosting, or a similar option.
You’ll see any WordPress installations already associated with the account.
Click Install near the top of the WordPress Management page.
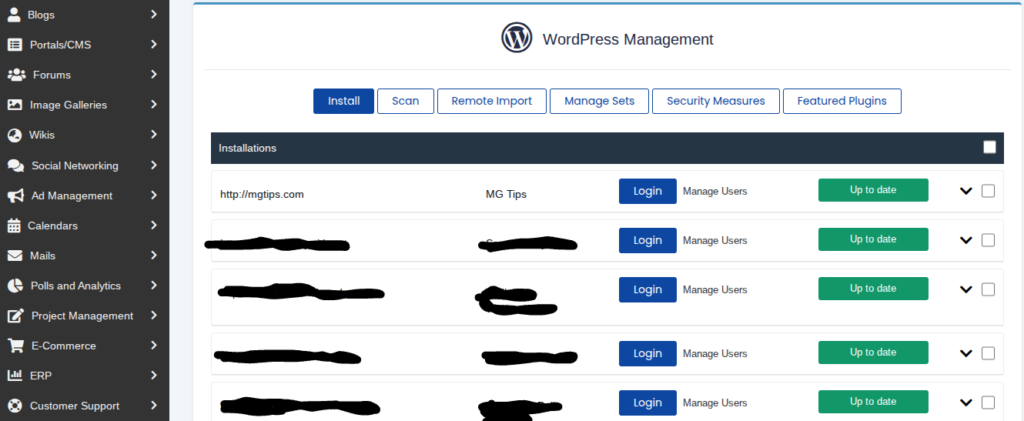
If you already have other websites on your account, they may also appear on this screen.
Step 10: Choose Where To Install WordPress
The WordPress installation page lets you choose exactly where WordPress should be installed.
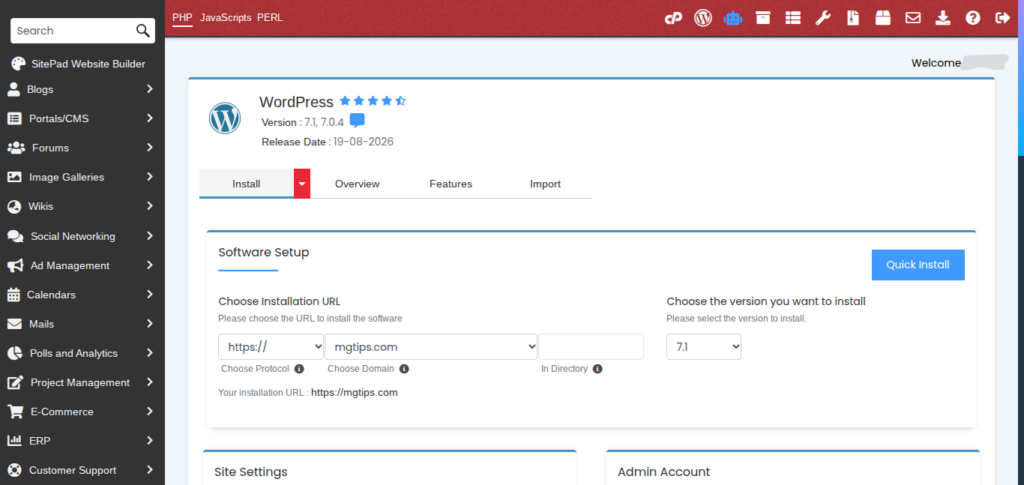
Under Choose Installation URL, select:
Protocol: Choose https:// whenever SSL is available for your domain.
Domain: Select the domain you just added.
In Directory: For a normal website installation, leave this field blank.
This part is important.
If you type something such as:
wordpress
into the directory box, WordPress could be installed at:
yourwebsite.com/wordpress/
instead of:
yourwebsite.com
For most new websites, you want WordPress installed directly on the main domain, so leave the directory field empty.
Step 11: Enter Your WordPress Site Information
Scroll farther down the WordPress installation page.
You’ll normally be asked to enter information such as:
- Site name
- Site description
- Administrator username
- Administrator password
- Administrator email address
You can change the site name and description later, so don’t spend too much time worrying about getting those perfect during installation.
Your administrator information is more important.
Choose A Secure Administrator Login
Don’t use an obvious username such as:
admin
Choose something less predictable.
Use a strong, unique password and store it somewhere secure.
Also make sure the administrator email address is one you can access. WordPress may use this address for important notifications and password recovery.
If the installer gives you additional plugin, theme or advanced options, you don’t have to enable everything.
You can always install themes and plugins later from inside WordPress.
Once you’ve reviewed your settings, click the button to complete the installation.
WordPress should only take a short time to install.
Step 12: Log Into Your New WordPress Website
After installation is complete, you’ll receive the address for your website and your WordPress administration area.
The administrator login is normally located at:
yourwebsite.com/wp-admin/
Enter the username and password you created during installation.
You’ll then arrive at the WordPress Dashboard.
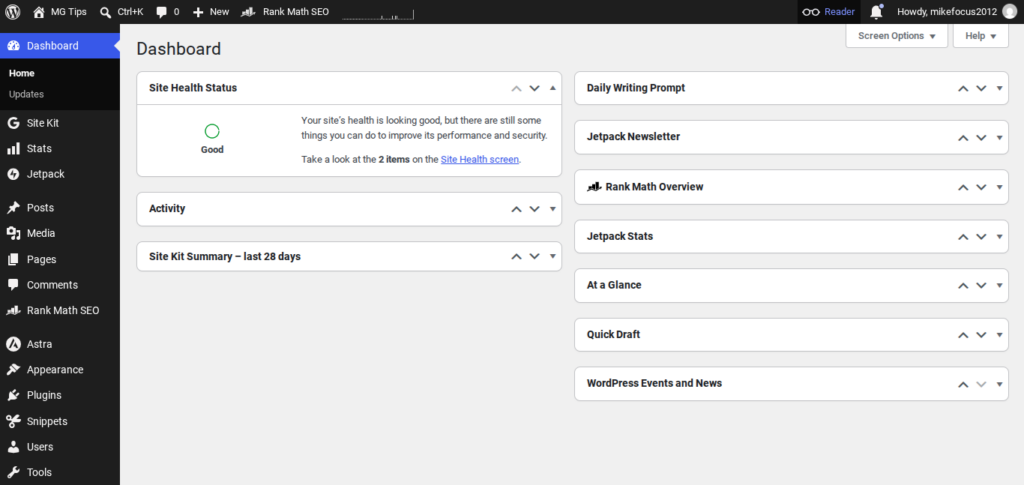
This is the main control area for your website.
From the WordPress Dashboard, you can:
- Create pages
- Publish blog posts
- Upload images
- Change your site’s design
- Install plugins
- Manage menus
- Add users
- Adjust website settings
At this point, your hosting account, domain and WordPress installation are connected and you’re ready to start building your website.
Mike’s Tip: Bookmark your WordPress login page. For most day-to-day website work, you’ll spend far more time in the WordPress Dashboard than inside cPanel.
What Should You Do Next?
Getting hosting and installing WordPress is only the beginning.
You don’t need to build everything at once.
I would start with the basic structure of the website.
For many sites, that means creating pages such as:
Home
Explain what your website is about and help visitors find your most useful content.
About
Tell visitors who is behind the website and why you created it.
Contact
Give readers a way to contact you.
Privacy Policy
Explain how information is collected and handled on your website.
Depending on your site, you may also need pages covering affiliate disclosures, terms, disclaimers, cookies and other legal or transparency information.
Then you can begin creating the actual content that will make people want to visit your site.
Why I Like WordPress For Building Websites
There are many ways to build websites today.
I continue to like WordPress because it gives website owners a lot of control over what they build.
You can start with a relatively simple website and gradually add features as you need them.
There are thousands of themes and plugins available, and WordPress can be used for everything from a simple blog to a business website, affiliate site or much larger content website.
It also means you aren’t limited to a proprietary website builder where moving your website somewhere else may be more difficult.
WordPress does have a learning curve, but you don’t need to master everything before you start.
Learn what you need as you build.
Why I Use InMotion Hosting
I’ve used InMotion Hosting for my own websites for several years, including MGTips.com.
The cPanel, domain and WordPress screenshots in this guide come from the same hosting environment I use to manage my own sites.
No hosting company is going to be the perfect choice for everyone, but I’ve found InMotion to be a practical option for managing WordPress websites while still giving me access to traditional hosting tools such as cPanel.
Depending on the plan currently offered, features may include things such as:
- WordPress hosting tools
- SSL certificates
- Email accounts
- NVMe storage
- Security features
- Multiple website support
- Domain registration options
- Website migration assistance
Features, limits and pricing can change, so I recommend checking the current InMotion plan information before purchasing.
See Current InMotion Hosting Plans
A Note About Hosting Prices
One reason I haven’t filled this guide with specific promotional prices is simple:
Hosting prices change.
A promotion available today may not be available six months from now.
You may also see different prices depending on the plan and billing period you select.
Instead of choosing a host because one advertisement says “$X.XX/month,” compare:
- What you’re paying today
- How long that price applies
- What’s included
- How many websites you can host
- Resource limits
- Renewal pricing
- Whether you can upgrade later
The cheapest hosting isn’t automatically the best value.
At the same time, most beginners don’t need the most expensive package either.
Frequently Asked Questions
Do I need web hosting to have a website?
If you’re building a self-hosted WordPress website, yes. Your website needs a server where its files and data can be stored and accessed online.
What’s the difference between a domain and hosting?
Your domain is your website’s address. Hosting is the service that stores and serves your website.
They’re connected, but they’re not the same thing.
Do I have to buy my domain from InMotion?
No. You can generally use a domain registered with another domain registrar and connect it to your hosting account.
If your hosting package includes a domain offer, however, registering it during setup may be convenient.
Does InMotion include WordPress?
InMotion supports WordPress and provides tools for installing it. Check the current hosting plan you’re considering for the exact features included.
Can I host more than one website?
Some hosting plans allow multiple websites, while entry-level plans may have lower limits.
If you think you’ll build several websites, check the website limit before choosing your plan.
Can I upgrade my hosting later?
Hosting providers generally offer ways to move to higher-level services as a website grows. Check InMotion’s current upgrade options if this is important to you.
Do I need to know how to code?
No.
Knowing some HTML and CSS can certainly be useful, but you don’t need to be a programmer to create a WordPress website.
How long does it take to set up a website?
You can purchase hosting and install WordPress relatively quickly.
Building a useful website is different.
Creating the design, important pages and quality content can take considerably longer, and most good websites continue developing over time.
Is WordPress free?
The WordPress software itself is free and open source.
You’ll still have costs associated with running the website, such as hosting and potentially your domain, premium themes, plugins or other services you decide to use.
Should I choose the cheapest hosting plan?
Not necessarily.
Choose the least expensive plan that comfortably provides the features and resources you reasonably expect to need.
There’s little reason to pay for resources you won’t use, but choosing a plan that’s too restrictive can also create unnecessary headaches.
What happens when my introductory hosting price ends?
Your hosting will normally renew at the applicable regular rate rather than continuing indefinitely at the introductory promotional price.
Check the renewal information before purchasing so you understand the longer-term cost.
Ready to Start Your Website?
You don’t need to have your entire website planned before you begin.
Start with the basics:
Choose your hosting.
Register or connect your domain.
Install WordPress.
Create your important pages.
Then start publishing genuinely useful content.
You can improve the design, learn new tools and add more features as your website grows.
If you’d like to use InMotion Hosting, you can use the link below to view their current plans, features and pricing.
Get Started With InMotion Hosting
Affiliate Disclosure: The link above is an affiliate link. If you purchase InMotion Hosting through my link, I may receive a commission at no additional cost to you. This helps support MGTips.com and allows me to continue creating free tutorials and resources.
Hosting plans, features, promotional offers and pricing can change. Always review the current information provided by InMotion Hosting before completing your purchase.
Author: Mike G
Last Updated: August 2026